
Preconfigured out-of-the-box workflows are available that support the demand-to-budget process that focuses on demands and the realization of those demands in projects. The workflow starts with the creation of a demand and guides the user through the process of either making a new project out of the demand, or assigning the demand to an existing project with similar architecture scope.
You can do any of the following to trigger the workflow:
- Go to the content area of a demand and click Workflow > Register Demand.
- Click the orange New button in the masthead and select Demand to automatically trigger the Register Demand workflow
Once a workflow is triggered, the editor will open so that the demand can be documented assessed, and approved. The next workflow step focuses on the decision to assign the demand to a new project or an existing project. If a new project is created, the relevant information captured for the demand can be copied to the new project and a new workflow is triggered to manage the new project.
The Workflows node in the left navigation panel provides access to all workflow activities that they are currently responsible for. The workflow activities that you are responsible for are displayed when you click the Workflows node in the left navigation pane. Go to Workflows > click a workflow activity
The out-of-the-box demand to budget workflows are available for users working with the license package Strategic Portfolio Management.
Trigger a workflow
How you trigger a workflow will demand on how your solution administrator configures the workflow.
Typically, a workflow will be triggered via the Workflow button in a content area. Potentially you may have different workflows available that can be triggered and they will have a caption specified by the person doing the workflow configuration. Typically an editor or view opens in the workflow that you will be required to process and confirm as complete. Once a workflow activity is complete, it will move to the next step in the sequence and the user responsible will receive a notification that will explain the task and provide a link to where they can complete the task.s
In some cases, a workflow step may be a system-generated action that does not require user input or user action. Typically, an informational message will be configured stating that the workflow step has been executed.
Take care of your workflow activities
The Workflows node in the left navigation panel provides access to all workflow activities that they are currently responsible for. Click the Workflows node to see the Workflow Activities explorer with all workflow activities that you are responsible for.
Click a workflow activity to open the workspace showing the asset that is targeted by the workflow as well as details about the workflow and workflow step.
Perform the workflow step. The first page of the workflow activity content area will display a page with a caption describing the activity. The page typically displays a guided data view which provides the relevant attributes and views as well as data quality rules that highlight potential data quality violations. Specify the data in the page and click the Confirm button to complete the task. If relevant, a Refuse button may also be available.
Understand the workflow step and the overall workflow. The Workflow Details page in the content area provides all the necessary information for the user to understand the workflow activity to be performed as well as an overview of where they are in the workflow process.
- Workflow: Displays most important details about the workflow activity including information about what the task is, the asset that is targeted and whether the workflow activity still needs to be performed or not.
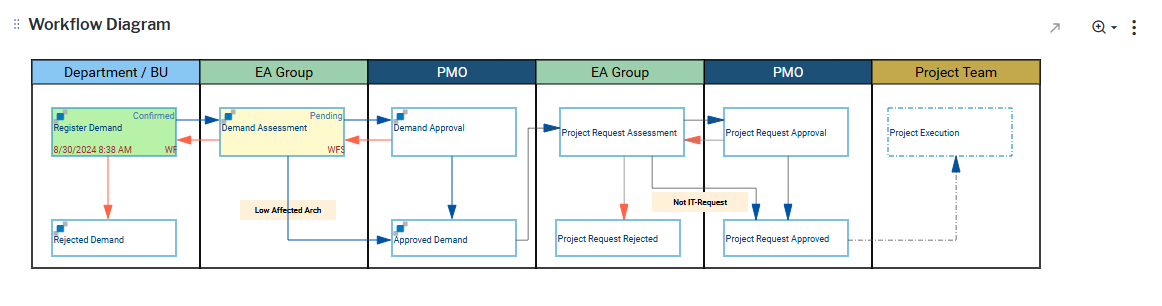
- Workflow Diagram: Provides a visualization of the workflow and all of its workflow steps; responsible organizations, and potential paths depending on which workflow step conditions are met.
- Object Details: Displays the most important information about the asset that is targeted by the current workflow activity.