Capture application data
Users with the user profiles Application Manager, Portfolio Manager, and Portfolio Admin can add and edit applications in Alfabet .
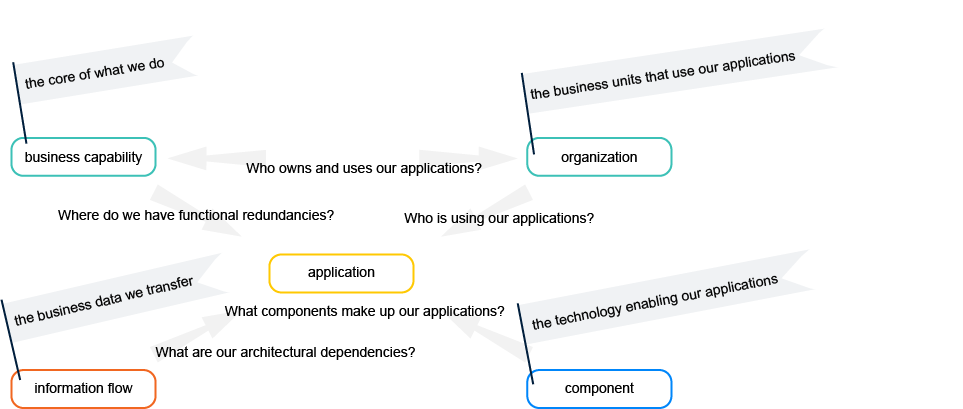
An application is a software package that provides functionality to end users. It has a lifecycle and may have predecessor and successor versions.
An application supports the company's core business capabilities to accomplish its mission. It will transfer business data by means of information flows . The application operates on a platform made up of hardware and software components that provide the technologies that enable the application.
An application differs from a component in that the application provides functionality that is used by end users. Components, on the other hand, do not typically provide functionality to end users but rather provide technical functionality to support an application. For example, applications include products like customer portals, project management systems, vacation tracking systems, or a product like SAP@CRM System. Components include operating systems, Web servers, and Web browsers, or a product like SQL Server Database Management Studio.
The application directly supports the company to realize its business capabilities and supports its business processes . Typically, users will know the application by name and the name is typically different than the name of the vendor delivering the application. An application will have its own budget.
The following table serves as an aid when trying to determine whether an object in your IT architecture is an application or a component.
| Is it an application or a component? | Application | Component |
|
Does it provide support to business capabilities or business processes |
yes |
no |
|
Does it provide business benefit on its own? |
yes |
no |
|
Does it have a service desk? |
yes |
maybe |
|
Does it have an internal name or business-related name that is known by the end user? |
yes |
maybe |
|
Can an end user work with it? |
yes |
maybe |
|
Can it be used in different applications? |
no |
yes |
|
Is it a standard IT product such as an operating system, infrastructure component, or database? |
no |
yes |
You can add a new application from anywhere in the product via the orange New button in the header. Or go to Application Architecture > Applications.
Create a new application from scratch. Click New > Application. Specify the application's attributes as well as the relationships that the application has to other assets in the repository.
A guided data entry view is available to help you provide relevant data and ensure data quality for the applications in your repository. When you create a new application in the editor, click the Close and Continue as Guided Editing button to open the data entry view. Or go to the application's content area toolbar and click Analysis View > Data Entry View.
You will see a content area page with an additional panel listing content items like Basic Data, Lifecycle Data, Evaluation. Click the content item caption to navigate to the content item in the data entry view. Symbols with numbers in the right panel indicate how many data quality issues exist. Click the data quality issue symbol to navigate your focus directly to the spot where you can fix the issue.
Copy an existing application to create a new application. All information from the existing application is copied to the new application. Select the checkbox  of the application you want to copy and click New > Create Copy. Edit the attributes and relationships of the copied application.
Version an existing application. Every application is an application version with its own defined lifecycle. An application may have predecessor and successor versions. All information from the existing application is copied to the new application. The Version attribute is updated, and the start date will begin one day after the base application's end date and the end date will begin 5 years after the start date. These dates may be edited as needed. To version an existing application, select the checkbox of the application you want to version and click New > Version. Change the version number and relevant attributes like start and end dates.
Create a variant of an existing application.
The license package Enterprise Architecture Management is required to work with application variants.
An application variant accounts for specific aspects of an application version such as the information flows needed to integrate the application in a local architecture environment. All information including the start and end dates are copied from the existing application to the new variant. Var is appended to the Version attribute. These dates may be edited as needed. Select the checkbox of the application you want to version and click New > Version. Change the version number and relevant attributes like start and end dates.
Edit the attributes and relationships for an application. Click the Navigate  button next to an application to open its content area. Specify the application's attributes as well as the relationships that the application has to other assets in the repository.
Try to capture as much information as possible about the application because complete data considerably improves the results of business questions and other analytics.
Once an application is in the repository, you can define more details about it in the Applications data workbench . Or specify and analyze the application in detail in its content area . In the data workbench, click the Navigate button for an application to open its content area > Overview page.
Per default, the data workbench displays a limited set of basic attributes. You can add more columns via the Structure column to capture other attributes directly in the data workbench.
Define the basic data.
- Name: (Mandatory) Enter a name for the application that is known to end users. The application's name is typically different than the name of the vendor delivering the application. You can add an abbreviation (3-4 letters) of the name in the Short Name field to use in diagrams and other visualizations.
- Version: Enter a version number for the application. It is recommended that you document major and minor release versions (<MajorVersion.MinorVersion>). For example, version 2.1 (<MajorVersion.MinorVersion>). You could document patch releases (<MajorVersion.MinorVersion.PatchRelease>) if your organization requires this level of detail.
-
Status: This is an approval status and typically indicates the level of quality of the information about the application. The release status determines whether an application can or cannot be deleted. Possible values are:
- Draft: The application has only mandatory data defined.
- Under Review: The application is documented and being reviewed. An application with this release status cannot be deleted.
- Approved: The application has been approved by the responsible stakeholders. An application cannot be deleted when it has an approved release status. An application with this release status cannot be deleted.
- Data imported: The data regarding this application has been imported from an external system. Additional changes may be required to improve the data quality. An application with this release status can be deleted.
- Trash: The application is no longer valid and can be deleted.
- ICT Object: The ICT object that owns the application.
- Link to Horizzon: Displays a link to the business process that the application references via the Served by attribute in Horizzon.
- Authorized User: The user who creates the application is the authorized user per default. This can be changed.
- Authorized User Groups: Select one or more authorized user groups that shall have write permissions to the application. All users in the authorized user group can edit the application.
Define the architecture attributes.
-
Architecture Type: The type of architecture infrastructure of the application. Possible values are:
- Client-Server: The application divides tasks or workloads between the providers and consumers of a resource or service.
- Cloud-Based: The application runs on SaaS cloud environments. The cloud infrastructure could be local or remote to the organization.
- Distributed: The application runs on multiple computers within a network. The network boundary can extend from private intranets to public clouds.
- External Webpage: The application is an external resource represented through a web link.
- Mainframe: The application is used by large organizations to carry out critical processing tasks such as bulk processing of data, transactions, planning or statistical activities.
- Stand-Alone: The application is a self-contained application that does not rely on external entities to complete a task.
- Unknown: The architecture type has not yet been assessed.
-
Authentication: The authentication method used for the application. Possible values are:
- Autonomous: The application supports autonomous methods such as Direct Autonomous Authentication (DAA) for authentication. This can be carried out through mobile or remote authentication systems.
- Basic Access: The applications support basic authentication based on a username and password. Protocols and layers such as HTTPS, SSL. or TLS could be used to enhance security, but these are not mandatory.
- Multi-Factor: The application requires more than one method of authentication from independent verification sources to verify the transactional identity.
- Multi-Factor & SSO: The application supports both multi-factor authentication (MFA) and single sign-on (SSO) authentication methods.
- No Authentication: The application does not support authentication.
- Single Sign-On: The application supports the use of a single ID and password to gain access to several related or unrelated systems.
- Unknown: The authentication mode has not yet been assessed.
-
Development Type: Development information about the application. Possible values are:
- Bespoke: The application was created specifically to address a unique use case.
- COTS - Configured: A commercial off-the-shelf application that has been configured or supports configuration to fulfill the requirements of the enterprise and is fully supported and upgrade-stable.
- COTS - Customized: A commercial off-the-shelf application that is customized or contains organization-specific code/programming to suit the requirements of the enterprise.
- Unknown: The application development type has not yet been assessed.
-
Pace-Layered Governance: Classification of application according to the Pace-Layered Application Strategy to categorize, select, manage, and govern applications to support business change, differentiation, and innovation. Possible values are:
- System of Differentiation: The application enables unique company processes or industry-specific capabilities. The application has a medium-length lifecycle (one to three years) but needs to be reconfigured frequently to accommodate changing business practices or customer requirements.
- System of Innovation: The application is built on an ad-hoc basis to address new business requirements or opportunities. The application typically has a short lifecycle (zero to 12 months) using departmental or outside resources and consumer-grade technologies.
- System of Record: The application is an established packaged application or legacy homegrown system that supports core transaction processing and manages the organization's critical master data. The rate of change is low because the processes are well-established and common to most organizations and often are subject to regulatory requirements.
-
Cloud Migration Strategy: Specify the planned strategy for the application regarding its migration to the cloud. Possible values are:
- Rehost: The application is SaaS-enabled but is either outdated or would require rehosting to the cloud platform.
- Rebuild: The application could be made cloud ready but would require a change in the build process to ensure seamless delivery. The concepts of CI/CD (continuous integration/continuous delivery) could be leveraged for these applications.
- Rearchitect: The application requires additional effort to make it cloud enabled. For example, this might be due to application health monitoring, application security, data backup and policies, scalability and replication zones, disaster recovery, network utilization, multi-channel communication, or identity management.
- Refactor: The application requires some changes in code to be eligible for migration to the cloud. The application can be modular or a self-contained application with services that can easily be refactored.
- Retain/Retire: The application supports a business capability for which the Business Relevant indicator is set to Business Enabling or Business Operating and the application cannot be migrated to the cloud immediately. Or the application is at the end of its lifecycle and is about to be retired.
- Unknown: The cloud migration strategy is not specified for the application.
- Subject to Compliance Regulation: Select the checkbox if the application is bound to compliance regulations. This is relevant for migration analytics.
-
Has AI Features: Select Yes to indicate that the application provides AI features. The AI Context page appears where you can specify the AI features that the application provides.
The license package Enterprise Portfolio Management is required to work with this attribute. The use case AI Portfolio Management must be activated.
Define the lifecycle attributes. All attributes in the Lifecycle attribute group in the application's content area should be specified before you specify the application's lifecycle phases.
- Start Date and End Date: The start and end date captures the period when the application is actively running and can be used in the company. This is also when the Object State attribute should be specified as Active. Click the calendar icon to select the date or enter the date in the date format Month/Day/Year. For example: 4/30/2023
-
Object State: The object state describes the use of the application in the real world. This can be understood as the operational status of the application. Possible values are:
- Plan: The application is proposed to be used and still in the stages of planning and building.
- Active: The application is currently being used. The active period begins with the application's start date and stops with the end date.
- Retired: The application is no longer used.
The object state should be changed from Plan to Active once the application's start date is reached. It should be changed to Retired when the application's end data is reached.
-
Recommendation: The strategic recommendation regarding future investment for the application. This information is required for TIME (Tolerate, Invest, Migrate, Eliminate) analyses and is used in many business questions. Possible values are:
- Tolerate: Invest in the application.
- Invest: Consider the application as a migration candidate.
- Migrate: Sundown the application.
- Eliminate: Discontinue the application.
- Strategic Application: Select the checkbox if the application is strategic for the company.
- Successor: The next application that will follow this application version.
Robust application lifecycle management is key to the health of the business and helps you to manage conflicts with end-of-life technologies to ensure that IT continues to support critical business areas. The application lifecycle describes the succession of stages that the application goes through over time. Alfabet allows all stages of an application's lifecycle to be documented from its phase-in to its phase-out of the organization including planning the build and deployment, putting it into production, and sundowning it.
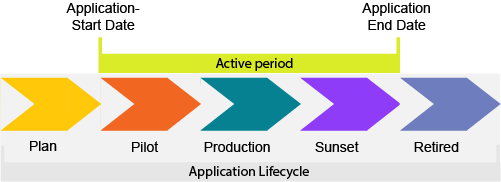
The application lifecycle is visualized in Gantt reports throughout Alfabet. The Gantt charts show the application’s active period which is the time between the start and end date when the application is actually being used. This is the period when the object state is set to Active. The active period typically corresponds to the lifecycle phases that represent when the application is in production, but this will depend on your company's lifecycle management methodology.
The active period could begin when the lifecycle phase Pilot starts and end when the lifecycle phase Sunset ends, as shown above. Or it could be that the active period begins and ends when the lifecycle phase Production begins and ends.
Not all company's document their application lifecycles and it is not mandatory in Alfabet . But by documenting the lifecycles of the applications in your application portfolio, you can understand whether relevant technologies are in place during the lifecycle of an application and which applications are approaching end-of-life but have no defined successor applications. With this insight, you can plan, communicate, and take corrective action for applications that are at risk and ensure the availability and reliability of applications for the company.
Go to the application's content area > Overview.
Capture general data about the application. Go to the Lifecycle Data attribute box and specify the following.
- Start Date and End Date: Captures when the application is actively running and can be used in the company. The Object State attribute should be specified set to Active during this period.
-
Object State: Describes the operational use of the application in the real world. Possible values are:
- Plan: The application is proposed to be used and still in the stages of planning and building.
- Active: The application is currently being used. The active period begins with the application's start date and stops with the end date.
- Retired: The application is no longer used.
The object state should be changed from Plan to Active once the application's start date is reached. It should be changed to Retired when the application's end data is reached.
-
Recommendation: The strategic recommendation regarding future investment for the application. This is required for TIME (Tolerate, Invest, Migrate, Eliminate) analyses. Possible values are:
- Tolerate: Invest in the application.
- Invest: Consider the application as a migration candidate.
- Migrate: Sundown the application.
- Eliminate: Discontinue the application.
- Strategic Application: Select if the application is strategic for the company.
- Successor: The next application that will follow this application version.
Describe the succession of stages that the application goes through. Go to the Application Lifecycle view.
- Click the application in the timeline and click
 edit button.
 - Activate the slider for the lifecycle phases to include and specify their start and end dates. The following lifecycle
- Plan: The application has been identified and evaluated for possible use in company.
- Implementation: Activities are underway to prepare the application for production.
- Production: The application is being used in company.
- Sunset: The application is still available but is not intended to be used for daily work.
- Read-Only: The application is no longer used but is available for reasons of documentation and compliance.
- Retired: The application should no longer be used.
You can also change the start and end dates of a lifecycle phase directly in the Gantt chart. Click on one of the ends of a lifecycle phase (colored bar) and drag the bar to define the start and end dates.
- Click Align Active Period to automatically align the start/end dates of the application's active period with the start/end dates of the lifecycle phases that are configured to begin and end the active period.
View the application lifecycle and the lifecycles of its components.
Go to Technology Context > Component Lifecycles view. The first row in the Gantt view is the application. The subordinate rows show the components that the application uses. For each component, the component lifecycle is displayed.
A role represents a functional responsibility that a user or organization has for the application. A user assigned responsibility via a role has read-only permissions to the application. Multiple roles can be assigned to an application in the Applications data workbench or the application content area via Overview > Responsibilities. A person or organization might have any of the following roles for the application as well as custom roles added by your company:
- Application Manager: A person who is the subject matter expert from a functional and technical point of view.
- Architect: A person who is responsible for the governance of the application.
- Business Owner: A person or organization that owns the application and is responsible for managing the functional requirements.
- IT Owner: A person or IT organization that owns the application and thus typically responsible for approval decisions.
- Operations: An IT organization responsible for the operations of the application.
- Stakeholder: A person or organization that has an interest in the application and therefore requires read-only access permissions.
To specify responsibilities for the application:
- Click in the relevant role field to open the selector.
- Expand the ORGANIZATION or USER sections in the selector and select the person or organization fulfilling the role.
- Click OK to save the role definition and close the selector.
Go to the application's content area > Overview > Operational Expenses view and open it. The view shows the planned budget for the application. You can capture the costs for all cost types over the specified period of time displayed in the view.
Set the start and end years of the view. Click the  local button and change the First Year and Last Year fields.
Specify the planned budget for the application. by entering the costs directly in the Budget column for the year and cost type. You can enter costs in any currency that your portfolio administrator has configured. The available currencies are listed in the drop-down available in the Currency column.
Change the currency in the Total row. Click the local button and change the Total Sum Currency field. The sum in the the Total row will be calculated in the currency based on the currency exchange rate specified by your portfolio administrator.
Business capabilities must already be in the repository in order to define the business capability that the application provides. Some business questions in Alfabet can only be answered if the relationship between applications and business capabilities is defined.
Applications support the company to realize its business capabilities. For each application, you should define the business capabilities that the application provides in order to understand how the business may be at risk due to IT failure. You can specify multiple business capabilities that the application provides.
You can specify multiple business capabilities that the application provides.
- Go to the application's content area > Business Context > Relationships section > Provided Business Capabilities field.
- Enter the name of the business capability that the application provides, or click in the field to open the selector. Select each business capability that you want to assign the application to. The Level ID indicates where the business capability is in the business capability hierarchy.
- Click outside of the selector to close it and update the Provided Business Capabilities field.
Business processes must already be in the repository in order to define the business processes that the application supports. Some business questions in Alfabet can only be answered if the relationship between applications and business processes is defined.
Applications provide functional support to the company's business processes. For each application, you should define the business processes that the application supports in order to understand the operational support that applications provide in the as-is architecture. You can specify multiple business processes that the application supports.
You can specify multiple business processes that the application supports.
- Go to the application's content area > Business Context > Relationships section > Supported Business Processes field.
- Enter the name of the business process that the application supports, or click in the field to open the selector. Select each business process that you want to assign the application to. The Level ID indicates where the business process is in the business process hierarchy.
- Click outside of the selector to close it and update the Supported Business Processes field.
You can specify which components an application needs to be operational. The components must already be in the repository. When you specify that a component is used by an application, you must create a local component based on the standard component. Any local component that an application uses can be added to the application's platform.
- Go to the application's content area > Technology Context > Used Components.
- Click New and select the standard component that that you want to base the local component on.
- Capture the basic data for the component.
- Name: (Mandatory) Enter a name for the component. You can add an abbreviation (3-4 letters) of the name in the Short Name field to use in diagrams and other visualizations.
- Version: Enter a version number for the component.
- Start Date and End Date: Captures the period when the component is actively used in the company.
- Application: (Mandatory) Displays the name of the application that uses the component.
- Platform Tier: Classifies the component according to its role in the client / server architecture:
- Client / Mobile: Includes the components that implement the part of the application that directly interacts with the user.
- Presentation: Includes the components that define and support the presentation / GUI of the applications.
- Business: Includes the components that primarily implement business / application logic or support the execution of such logic.
- Integration: Includes the components that are allowed for integration of (transfer of data between) components within or across platforms.
- Resource: Includes the components that provide resources for or are resources to other components.
- Platform Layer: Classifies the component according to its level of technical abstraction:
- Business Layer: Includes the components that focus on implementation of business logic and generate the business value.
- Software Layer: Includes the components that are required by the application and support components in the business layer but do not directly implement business logic.
- Infrastructure Layer: Contains logical instances of device software that run components or transport data between components.
- Is Visible: Switch on if the component shall be displayed in application explorers.
Analyze the application lifecycle against the components upon which the application is dependent. Look for components that are at their end-of-life in order to mitigate additional risk and cost for the application. Go to an application's content area > Technical Context > Component Lifecycles view. The first row in the Gantt view is the application. The subordinate rows show the components that the application uses. A component lifecycle consists of the following stages:
- Manufacturer Support: Indicates that the technology is relevant to be used in a production environment.
- Manufacturer Extended Support: Indicates that the technology is still available, but should be avoided for use in a production environment.
The Gantt chart also visualizes the component’s active period which is when the component is actually being used in the enterprise. Review the end date of the components and local components that the application relies on to ensure that the application continues to be supported.
Information flows exchange business data between applications. For each information flow, one application or peripheral is considered the source of the information flow and the other application or peripheral is considered the target of the information flow. The number of information flows that an application is associated with helps the application architect determine the complexity of the application, potential redundancies among applications, and the effort involved in migrating or replacing an application.
An application may have an unlimited number of incoming and outgoing information flows. The source or target of an information flow can either be an application or peripheral. Neither the source nor the target application/peripheral can have a Retired object state. The naming convention for information flows is: <Source Application> > <Target Application>
Go to an application's content area > Information Context. Scroll to the Information Flows view.
- Click the
 plus button > Create Incoming Information Flow if the application you are working with is the target of the information flow. In the Search for field, select either Application or Peripheral. Specify the source of the information flow in the Source Application field. Y
 - Click the plus button > Create Outgoing Information Flow if the application you are working with is the source of the information flow. In the Search for field, select either Application or Peripheral. Specify the target of the information flow in the Target Application field.
Specify the following attributes:
- Short Name: Define an abbreviation of 3-4 letters to display in diagrams and business graphics.
- Version: Enter a unique version number.
-
Object State: The object state may only be set to active if both its source and target applications have an active object state.The information flow must be set to retired if either the source or target application is retired. Possible values are:
- Plan: The information flow is proposed to be used and still in the stages of planning and building.
- Active: The information flow is currently and used now. The active period begins with the information flow's start date and ends with the end date.
- Retired: The information flow is no longer used.
-
Release Status: This is an approval status and typically indicates the level of quality of the information about the information flow. Possible values are:
- Draft: The information flow has only mandatory data defined.
- Under Review: The information flow is documented and being reviewed. An information flow with this release status cannot be deleted.
- Approved: The information flow has been approved by the responsible stakeholders. An information flow cannot be deleted when it has an approved release status. An information flow with this release status cannot be deleted.
- Data imported: The data regarding this information flow has been imported from an external system. Additional changes may be required to improve the data quality. An information flow with this release status can be deleted.
- Trash: The information flow is no longer valid and can be deleted.
- Start Date and End Date: Captures the period when the information flow is actively running and can be used in the company. The Object State should be set to Active during this period.
- From (Source) and To (Target): You can change the source or target of the information flow to a local component that has been defined for the source or target application. The component name will be displayed in parenthesis behind the application in the information flow name.
- Connection details: Specify the connection type , connection method , connection frequency , and connection data format for the information flow.
- Description: Enter a meaningful description that will clarify the purpose of the information flow.
- Authorized Access: As the creator of the information flow, you are automatically defined as the authorized user per default. The authorized user of the information flow can be changed. You can also define any authorized user group that should have Read/Write access permissions to the information flow.