Assets can be added to Alfabet in a variety of ways. Typically, an administrative user will import data to Alfabet and you will see these assets in the data workbenches. If you have write permissions, you can add new assets to the repository at any time while working in Alfabet. This can be done via the data workbenches available in the left navigation panel, via the toolbar of a content area or a data workbench in a content area. In some editors and content areas, a guided data view is available that provides a structured step-by-step experience to ensure that you capture relevant data and ensure data quality for some of the assets in your repository.
You can also create a new application, application group, business process, component, or project from anywhere in the user interface by using the orange New button in the masthead. Select one of the options in the New menu to open an editor to capture the basic data. The  button is only displayed to users that have write permissions.
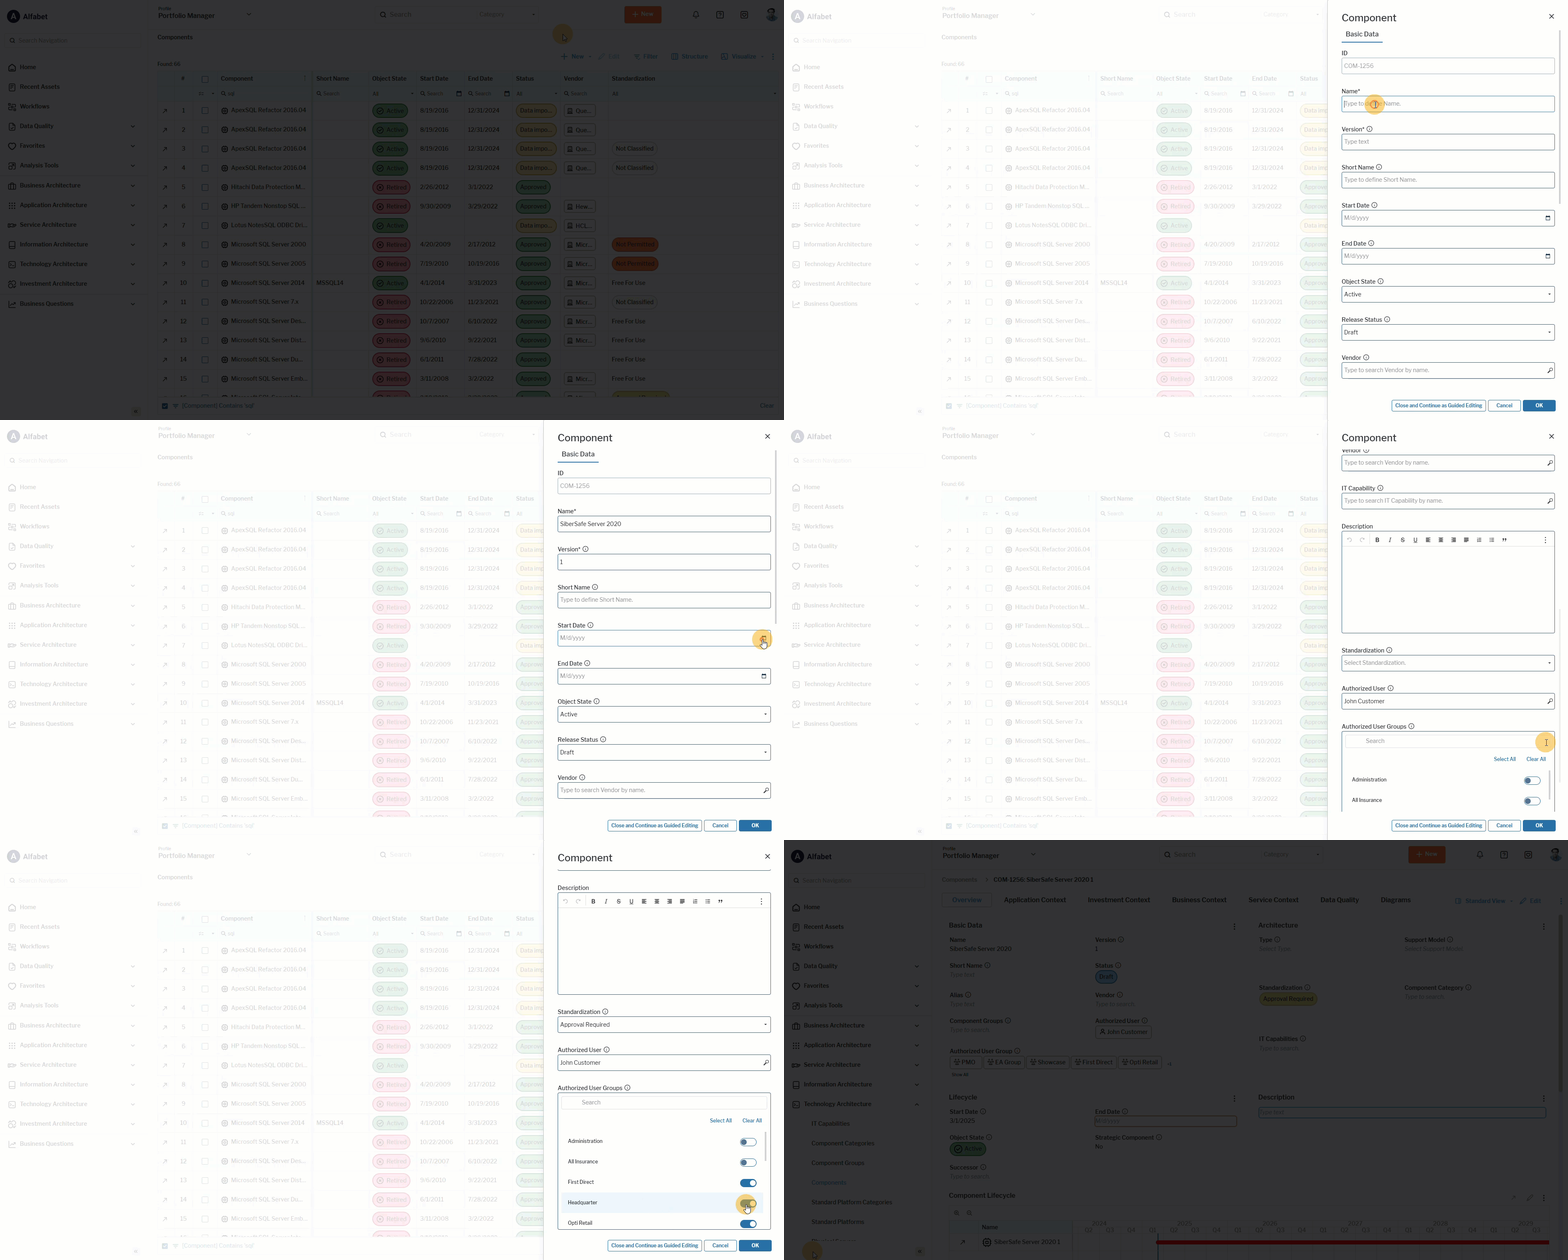 Click here to see how.
Add a new asset to a data workbench
Typically you will add assets to the repository when you are working in data workbenches. For example, click the button in the Applications data workbench to open an editor to capture the basic data for a new application. Only fields with an asterisk (*) are mandatory. Click Close or click the Close and Continue as Guided Editing button to edit the data with the help of the guided data entry capability.
You will see all assets relevant for the data workbench and be able to edit the ones that you have permissions for based on your status as an authorized user or a member of an authorized user group . A lock  symbol is displayed for assets that you do not have write permissions for.
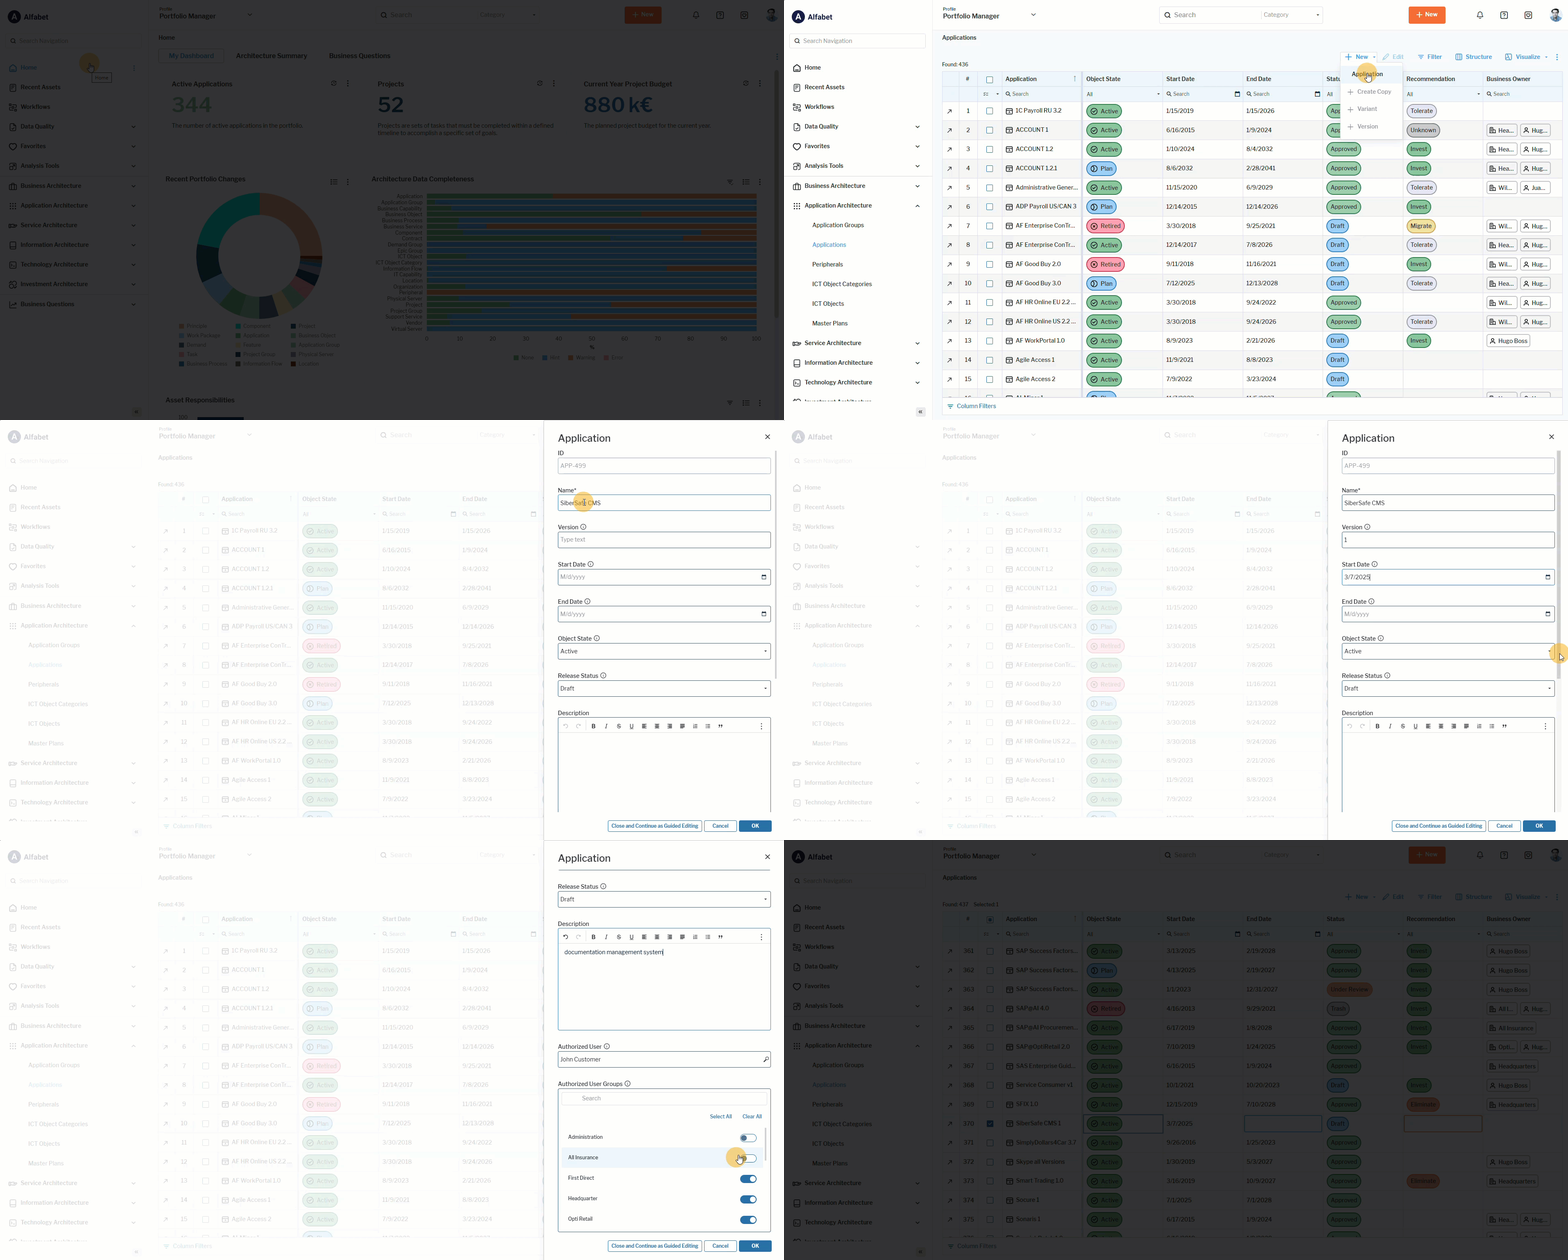 Click here to see how.
- If you have set filters, the assets with the changed values may no longer be displayed in the data workbench after you close the editor if they no longer meet the filter criteria.
- If value range restrictions apply to the selected assets, the selected value is only set for the assets for which it is permissible. You are informed about the data that will not be changed.
Edit a single asset directly in the data table
- Type text directly in a cell and press ENTER to save.
- Select the value in the drop-down list, or date picker
 and press ENTER to save. If you see an Advanced Search link on the bottom of a drop-down list for selection of assets, you can click the link to open a selector.
 - If multiple values can be defined in a cell, you will see the selected values on top of the drop-down list. Click an entry in the selector to select or clear.
- In drop-down lists and selectors, hover over the
 symbol to view an explanation of the value. If the Description field is specified for an asset like an application, ICT object, etc., you can hover over the symbol to see the asset's description.
 - Some columns may show references to other assets. For example, if the Provided Capabilities column is in an application data workbench, the business capability that the application supports is displayed. If the referenced asset has a grey border that gets darker when you point to it, you can single click it to open a preview that shows basic details about that asset. The preview is editable so you can update data on-the-spot. Double click it to navigate to the content area.
- Some columns may show a colored frame in a cell. This could indicate that a data quality issue exists. The frame is colored differently based on the type of data quality violation. Point to the colored frame to display a tooltip about the required data. Once the data quality violation is resolved. the colored frame is no longer displayed.
- URLs are displayed as a link. Click the link text to navigate to the external URL. Click in the field next to the text to edit the link. You can define the link target and a link text to display instead of the target URL.
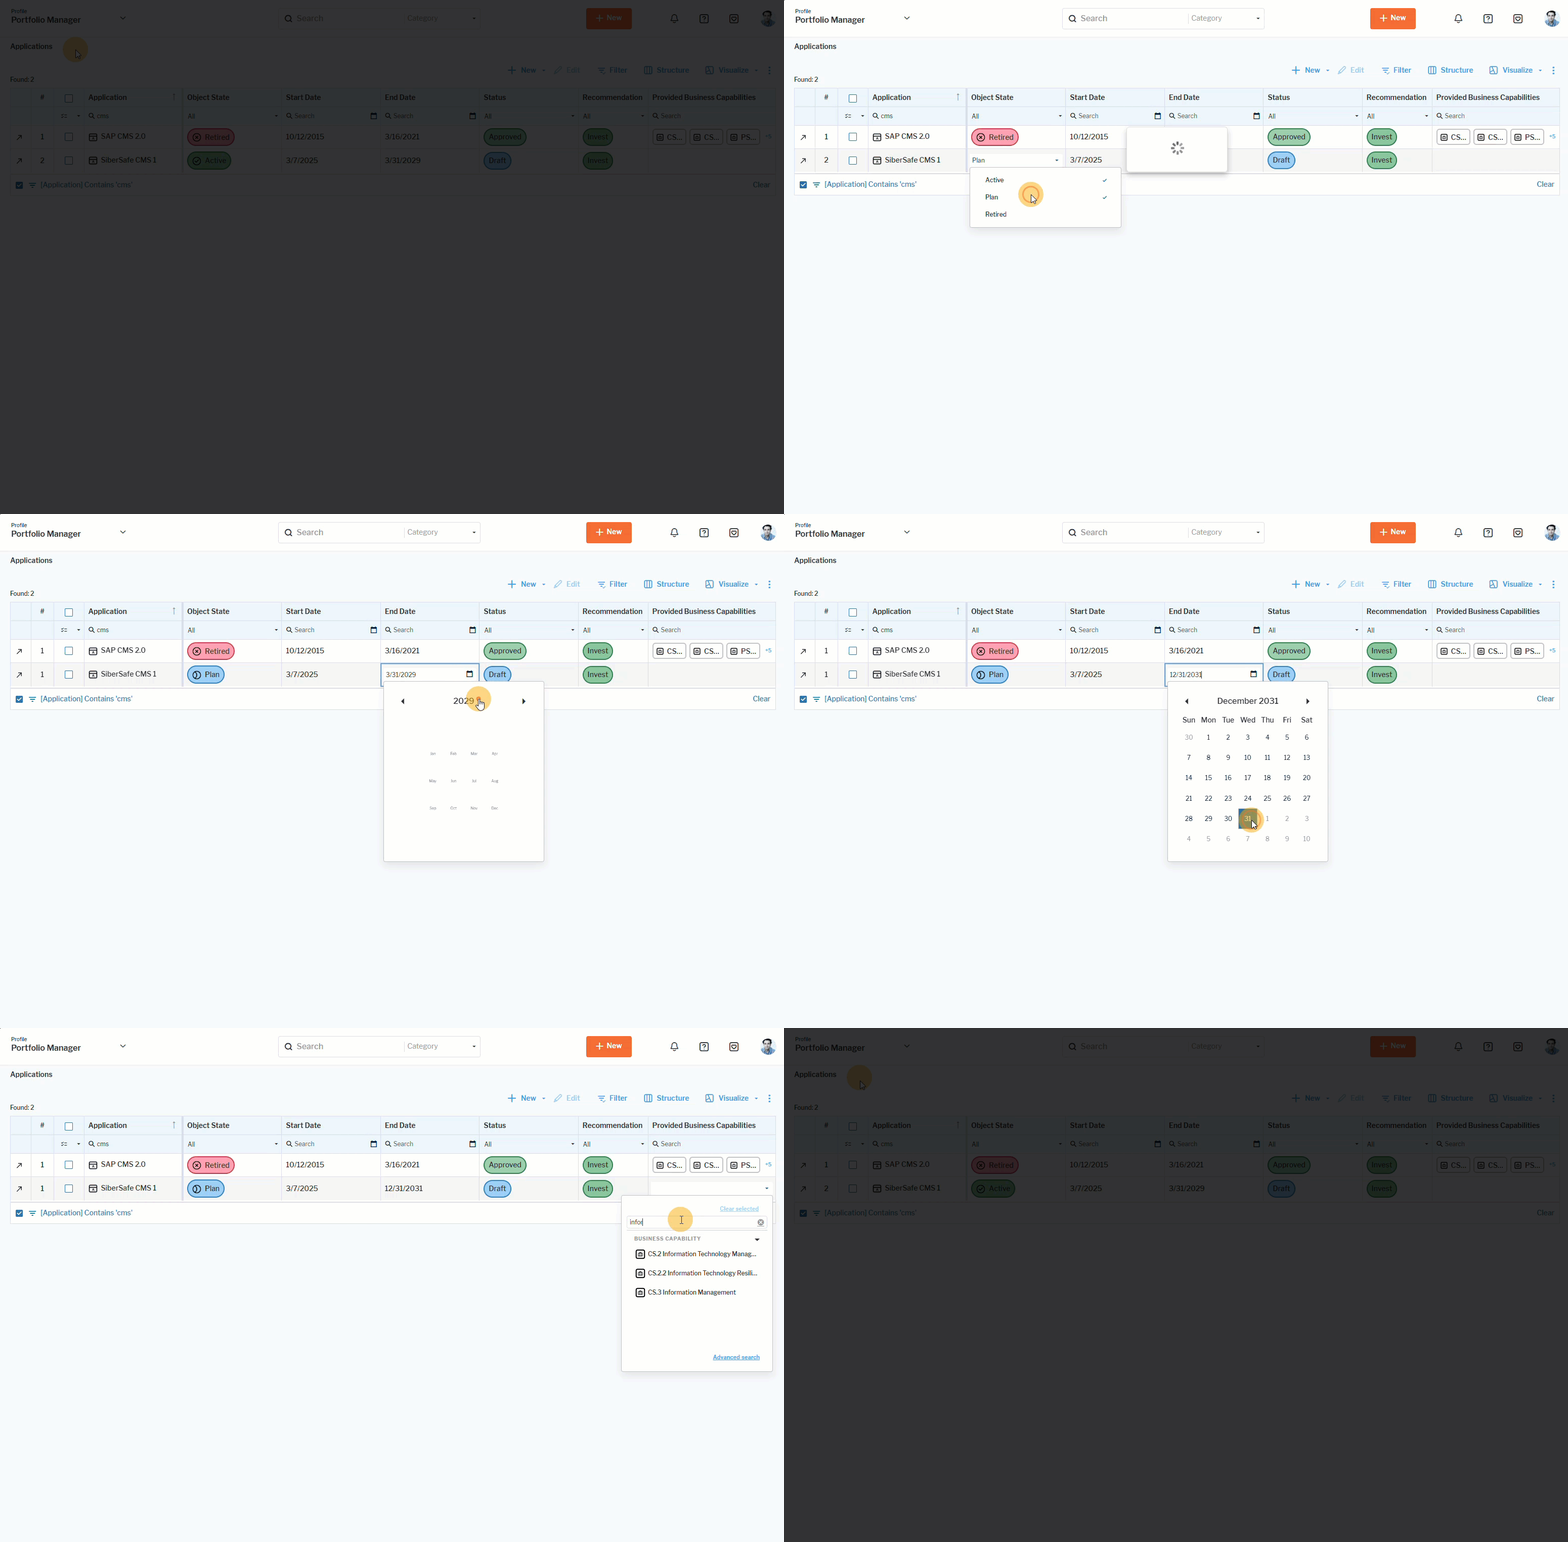 Click here to see how.
Edit multiple data at once in the data table
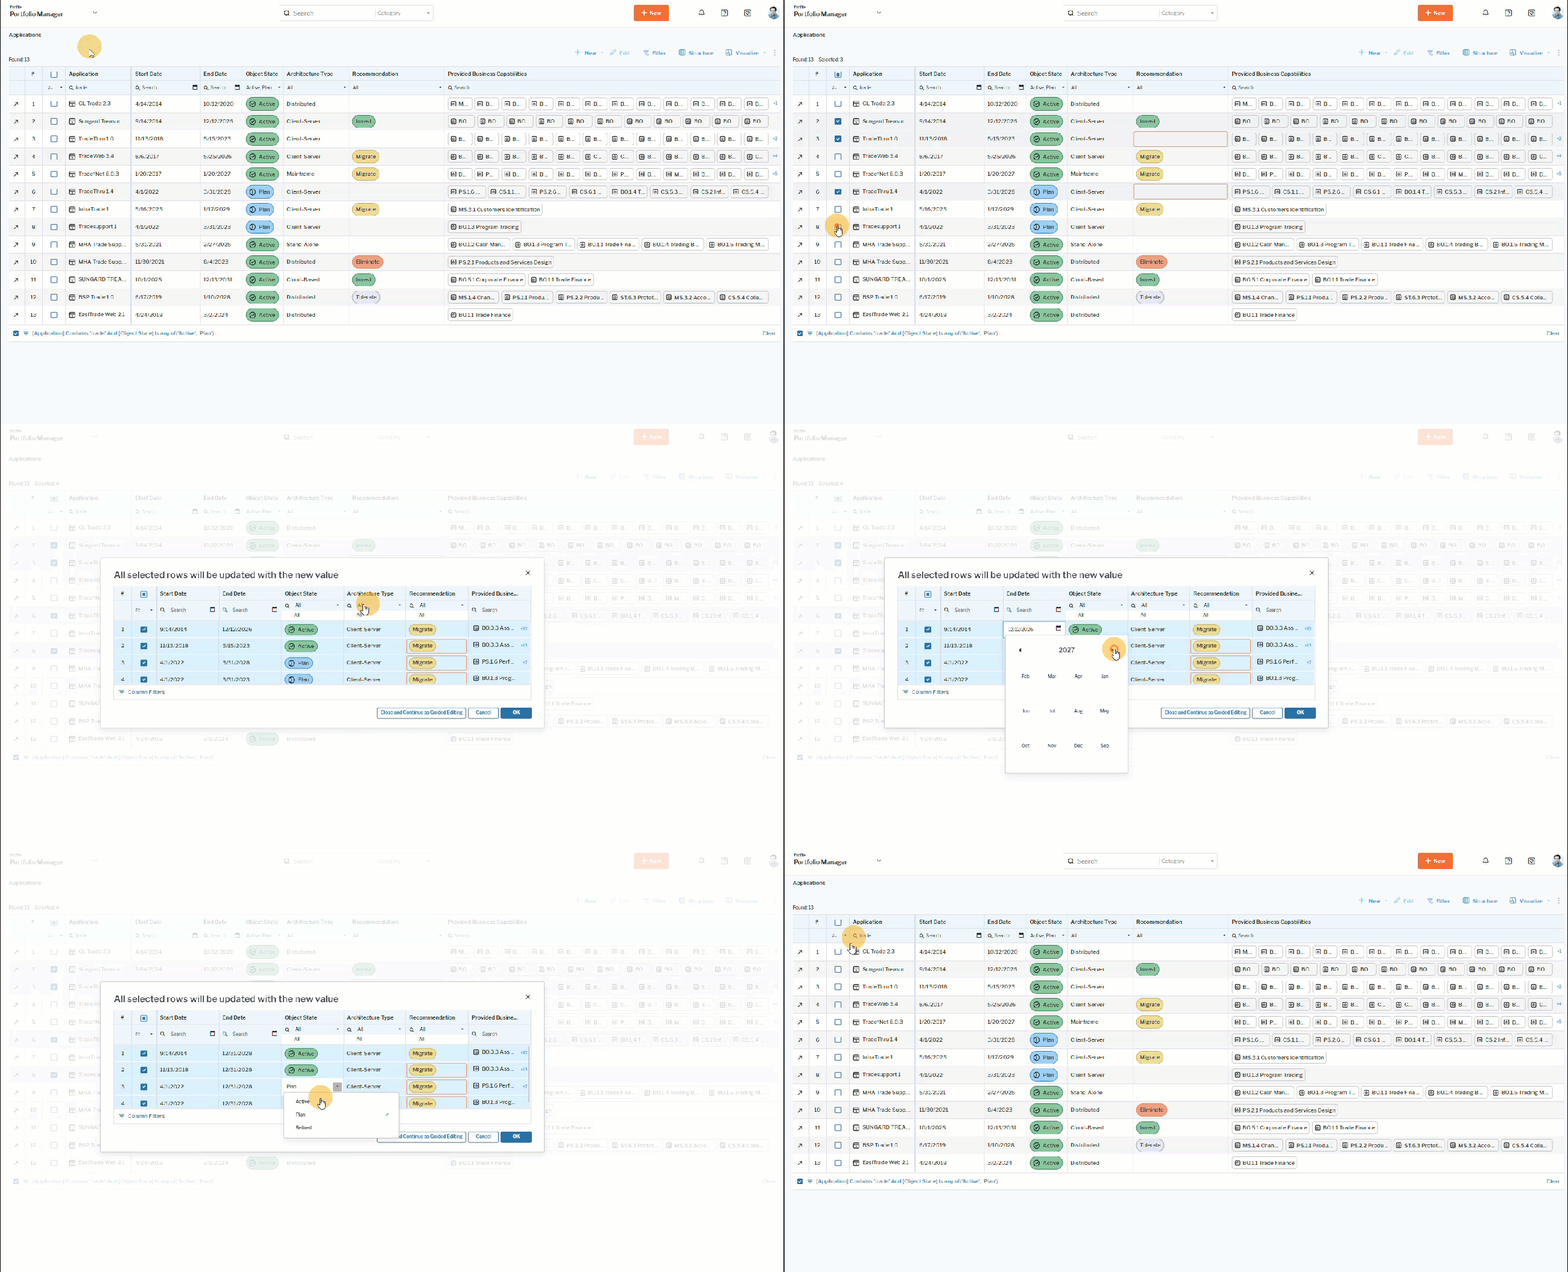
A bulk edit functionality is available that allows you to edit multiple assets at once if you are setting the same values for one or more attributes. You can also filter assets where a specific attribute is not defined and where the assets all require the same value.
- If necessary, set filters to focus on the assets you want to change.
- Select the checkboxes
 for the assets you want to edit.
 - Change the value in the cell of one of the assets you have selected.
The new value will overwrite the existing values. For example, if one asset has three stakeholders already specified and you specify only one stakeholder for the selected assets, all previously defined stakeholders will be removed and only the new stakeholder will be assigned.
- If 40 objects or less are selected: The bulk editor will open and display all of the selected assets with the valued changed for those assets. You can change other values in any other columns in the editor. The changed value will be applied to all assets displayed in the editor. Note that if you set filters in the bulk editor, your selection will be cleared and the assets will not be changed when the editor is closed. Click OK to apply your changes and close the editor. Clear the checkboxes of the assets that have been changed.
- If 41 to 300 objects are selected in the data table: A message is displayed describing the number of objects and extent of the changes that will be executed asynchronously. Confirm the dialog to continue with the changes. Users can continue working without waiting for all background activity to complete.
- If more than 300 objects are selected:Bulk update is not supported in the user interface. In such cases, a warning message informs the user that the maximum number of objects allowed for a simultaneous update has been exceeded and update via ADIF is recommended. Contact your solution designer for support.
- If 40 objects or less are selected: The bulk editor will open and display all of the selected assets with the valued changed for those assets. You can change other values in any other columns in the editor. The changed value will be applied to all assets displayed in the editor. Note that if you set filters in the bulk editor, your selection will be cleared and the assets will not be changed when the editor is closed. Click OK to apply your changes and close the editor. Clear the checkboxes
 Click here to see how.
Edit data with the help of guided data entry
Guided data entry is a structured step-by-step experience that ensures that you capture relevant data and ensure data quality for some of the assets in your repository. If guided data is available for an asset, a button to open the guided data view is available in the editor when you create a new asset. After you have entered mandatory information like Name, click the Close and Continue as Guided Editing button to open the data entry view. Or go to the asset's content area toolbar and click Analysis View > Data Entry View.
You will see a content area page with an additional pane listing content items like Basic Data, Lifecycle Data, Evaluation. A number shows how many violations exist for each section. Click the data quality issue symbol to navigate your focus directly to the spot where you can fix the issue.
Attribute fields will display a colored frame pointing out where a data quality issue exists. Content items may also display the a data quality severity symbol that shows where data can be improved. Once the data quality issue is resolved, the severity symbol will disappear.
Generate and translate text fields with AI
Alfabet provides advanced AI capabilities so that you can generate text in text fields in content areas and guided data views. The AI text processing capability is available only for the classes and attributes configured by your solution designer. The text generation creates text in the current language of the user interface language. The translation generation capability allows you to translate texts to any of the languages supported in Alfabet.
This feature is available on request. Learn more about how to enable text fields and activate AI services.
If the feature is activated, you will see the AI options for text generation in the  3-dots button of the attribute group (for example, where the Description field is located).
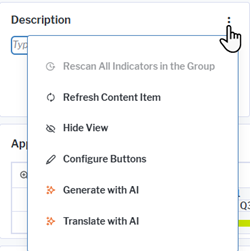
Generate or enhance a text via AI. Users can either add an own description or leave the field empty before using the Generate with AI option available in the 3-dots button
The text is generated based on the text provided by the user, if any, and the values of all object class properties that you have marked as relevant for text generation on implementation of the feature. Users can review and change the AI generated text in the AI editor or later directly in the text field. They can then decide whether to use the text. The text is discarded if the user clicks Cancel and overwriting the former, user defined text if the user clicks OK
On opening, AI editor shows the text added by the user for the description of an application:
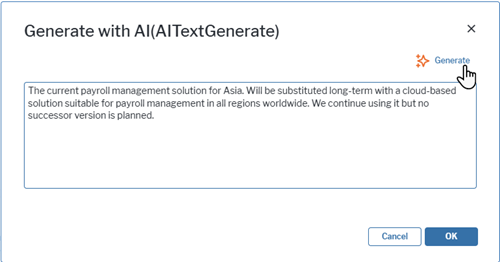
After the user clicked Generate, the text is altered by the AI. Information like application name and version, lifecycle, and strategic importance is available to the AI and used to enhance the information in the description:
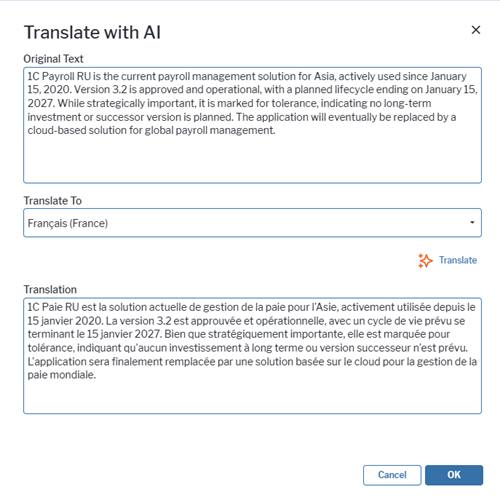
View a translation of a text. Users can click the Translate with AI option available via the 3-dots button to open a translation editor and translate the text to any target language. The translation is view only. It is not stored to the database on closing of the editor.