Define the ADIF export scheme
Definition of the ADIF export scheme is done in Alfabet Expand.
- Go to the ADIF tab.
- Right-click the root node and select Create Export Scheme.
- Set at least the following attributes of the new ADIF export scheme:
- Name: Define a unique name for the ADIF export scheme.
- Assistant: Select GenericAPIIntegration_Assistant.
- Category: If you would like to execute the ADIF export via the Job Scheduler functionality, you must select the correct category for the user case JobScheduler . For an overview of the configuration required to execute an ADIF scheme via the Job Scheduler functionality, see Activating the Job Schedule Functionality in the reference manual Configuring Alfabet with Alfabet Expand.
For a description of the other, optional parameters of the ADIF import scheme, see Configuring Data Export with ADIF in the reference manual Alfabet Data Integration Framework.
The definition of ADIF and the activation of the job scheduler functionality is identical for Alfabet 11 and Alfabet 10 releases and not yet included in the documentation for Alfabet 11. The links above open the documents from the Alfabet 10 documentation.
- Right-click the ADIF export scheme in the explorer and select the Create ADIF Scheme Details Using the Generic API Integration Assistant.
- In the assistant, define the basic attributes:
- Name: Define the name of the ADIF export entry that will be created within the ADIF export scheme by the assistant.
- Generic API Integration Database Connection: Select the Generic API integration database connection which you defined in the configuration step: Define a database connection object.
- Click the New > Add Resource Filter in the toolbar in the attribute field. A new editor opens.
- Define the following attributes in the given order:
- Operations attribute, select a POST endpoint from the third-party RESTful endpoints configured for the Generic API integration database connection.
- Primary Report: Select the report providing the data for the export which you created in the configuration step: Define a configured report providing export data.
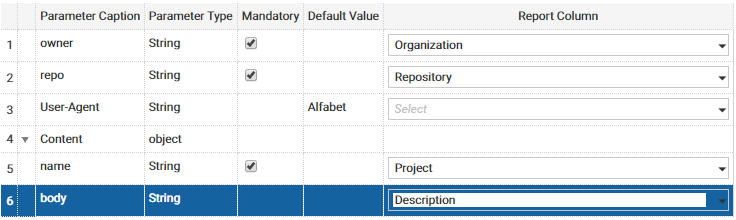
- A table is displayed below the Primary Report field for mapping of the RESTful service parameters to the values returned by the configured report. The table lists all parameters and JSON body fields of the selected endpoint. In the Report Column column, select the column of the dataset in the configured report providing the data for the parameter or JSON body field. You need to map at least the mandatory parameters and JSON body fields.
For the example given in the section Define a configured report providing export data the parameter mapping would be:
- Optionally, you can map attributes of the response of the RESTful service call to object class properties of the object class the configured report returns data for. In preparation of this step, it might be required to create a custom object class property for the object class to store the data. For information about creating object class properties, see Configuring Custom Properties for Protected or Public Object Classes in the reference manual Configuring Alfabet with Alfabet Expand.
The definition of custom object class properties is identical for Alfabet 11 and Alfabet 10 releases and not yet included in the documentation for Alfabet 11. The links above open the documents from the Alfabet 10 documentation.
If response values are mapped in the ADIF assistant, the respective object class properties will be automatically filled with the returned values on execution of the export:
- In the toolbar of the response class mapping field on the top right, click New > Add.
- Select the object class in the Class to Map the Response field.
- The return values mapped to the generic API integration connection via the resource bundle defined in the configuration step Defining the OAS Based RESTful Service Endpoints are displayed in a table. In the Class Property column, select the object class properties the return values shall be mapped to.
- Click OK to save the mapping.
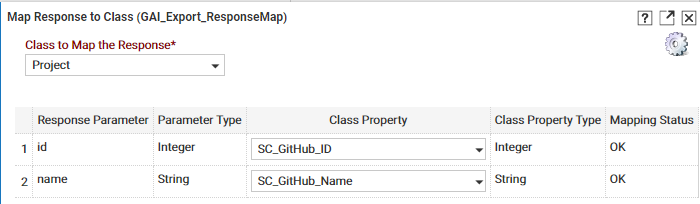
For the example given in the section Define a configured report providing export data the object class Project has two custom object class properties SC_GitHub_ID and SC_GitHub_Name to store the id and name of the GitHub Project which is created on basis of the Alfabet project during the call:
The mapping to the object class properties can also be used to restrict the projects listed in the configured reports to projects which do not have these properties set and are therefore not yet created in GitHub.
- Click OK to close the mapping definition.
- Click OK to close the assistant.
- In the ADIF explorer, right-click the ADIF export scheme and select the Reread from Database option to view the changes made in the ADIF scheme by the assistant. No other configurations are required in the ADIF scheme. You can now test and execute the ADIF scheme. Available test and execution methods are described in the reference manual Alfabet Data Integration Framework.